Learn how to seamlessly integrate machine learning models with your [Database] using SuperDuperDB to create efficient and scalable image classification systems.
This blog post explores how to integrate machine learning models directly with Databases using SuperDuperDB, streamlining the process and reducing operational overhead.
For this demo, we are using MongoDB as an example. SuperDuperDB also supports other databases, including vector-supported SQL databases like Postgres and non-vector-supported databases like MySQL and DuckDB. Please check the documentation for more information about its functionality and the range of data integrations it supports.

ML models and data often reside in separate silos, leading to complex MLOps pipelines. Current solutions require extracting and processing data through multiple tools, creating high operational overhead. Low-code tools and vector databases simplify integration but introduce flexibility issues and additional management complexities.
Unifying ML Models and [Databases] with SuperDuperDB
Integrating data and machine learning in a single environment is essential for smooth ML deployment. This approach avoids the complexities of MLOps, ETL processes, and managing separate vector databases.
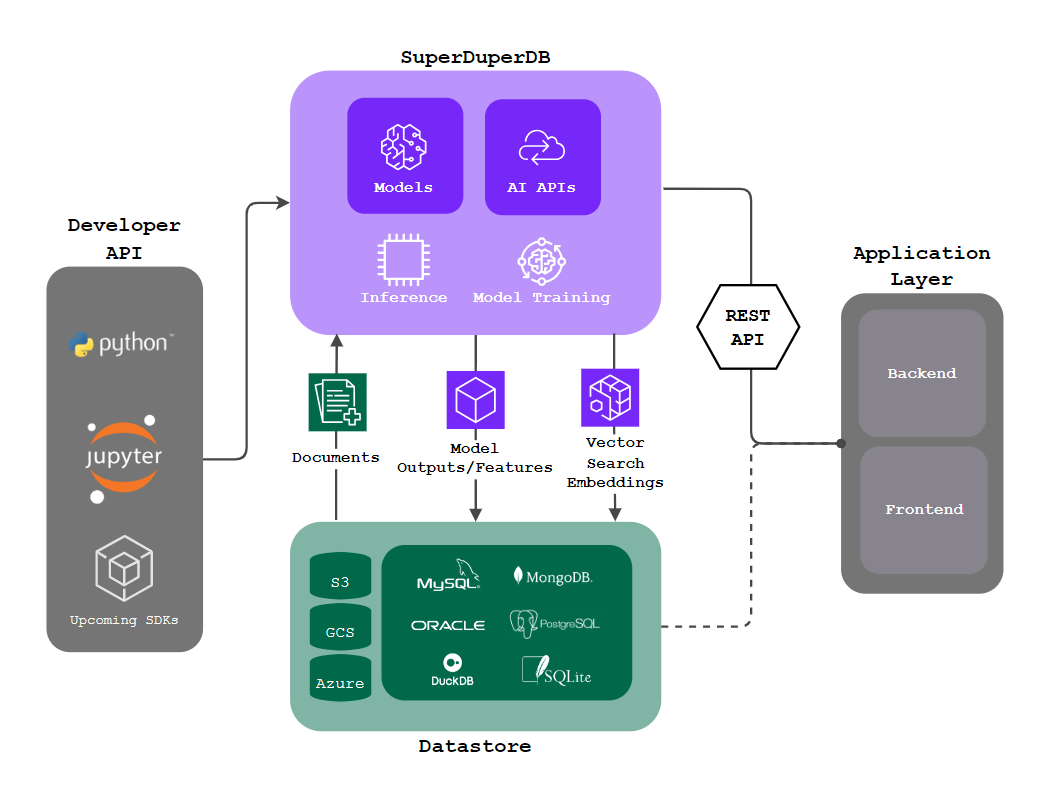
SuperDuperDB achieves this by directly connecting ML models with databases. It's an open-source framework that simplifies the integration of ML models, APIs, and vector search engines with your existing database infrastructure.

SuperDuperDB allows you to:
- Directly integrate ML models with your database for seamless data pre-processing, training and storage.
- Easily manage various ML models for different data types (text, images).
- Instantly process new queries and perform real-time predictions within your database.
A key benefit of SuperDuperDB is its flexibility, allowing custom function integration to meet diverse machine learning needs.
For this example, we will be using Logistic Regression model and MongoDB
Let’s integrate the Logistic Regression model into your MongoDB using SuperDuperDB.
Step 1: Install SuperDuperDB, Scikit-learn, Torch and Torchvision
pip install superduperdb
pip install scikit-learn torchvision torch
Step 2: Connect SuperDuperDB to your MongoDB database and define the collection
For this demo, we will be using a local MongoDB instance. However, this can be switched to MongoDB with authentication or even a MongoDB Atlas URI.
from superduperdb import superduper

db = superduper('mongodb://localhost:27017/test')

my_collection = Collection("documents")
The MongoDB URI can be either a locally hosted MongoDB instance or a MongoDB Atlas URI. For more information here
Step 3: Data Collection and Pre-processing
Assuming that you have a pandas dataframe with two columns where the column image_array consists of image arrays and the column category consists of the target labels (0 or 1).
import pandas as pd

df = pd.DataFrame({
    'image_array': image_arrays,
    'category': category
})
Split the data into train and test datasets, where train_data and test_data are lists of dictionaries with image data and labels.
N_DATAPOINTS = 1000

train_data = []
for index, row in df.iloc[:N_DATAPOINTS].iterrows():
    datatype = array(dtype=row['image_array'].dtype, shape=row['image_array'].shape)
    superddb.apply(datatype)
    train_data.append(Document({
        '_fold': 'train',
        'image': datatype(row['image_array']),
        'label': int(row['category'])
    }))

test_data = []
for index, row in df.iloc[N_DATAPOINTS:N_DATAPOINTS + 50].iterrows():
    datatype = array(dtype=row['image_array'].dtype, shape=row['image_array'].shape)
    superddb.apply(datatype)
    test_data.append(Document({
        '_fold': 'test',
        'image': datatype(row['image_array']),
        'label': int(row['category'])
    }))
Creating Custom Datatypes in SuperDuperDB
SuperDuperDB allows you to create custom datatypes to handle various data types that your database backend might not natively support. This flexibility enables you to insert any type of data into your database seamlessly.
For example, you can create custom datatypes for vectors, tensors, arrays, PDFs, images, audio files, videos, and more. Please check Create datatype for more examples and details on how to construct custom datatypes.
Step 4: Data Insertion
db.execute(my_collection.insert_many(train_data))
Step 5: Feature Engineering
Integration of torchvision Model with Database to compute Features to the train data inside the DB using superduperdb
Create a Model class with simple a Embedding model
import torchvision.models as models
from torchvision import transforms
from PIL import Image

class TorchVisionEmbedding:
    def __init__(self):
        self.resnet = models.resnet18(pretrained=True)

        self.resnet.eval()

    def preprocess(self, image_array):
        image = Image.fromarray(image_array.astype(np.uint8))
        preprocess = preprocess = transforms.Compose([
            transforms.Resize(256),
            transforms.CenterCrop(224),
            transforms.ToTensor(),
            transforms.Normalize(mean=[0.485, 0.456, 0.406], std=[0.229, 0.224, 0.225]),
        ])
        tensor_image = preprocess(image)
        return tensor_image
Model object
from superduperdb.ext.torch import TorchModel

model = TorchVisionEmbedding()
superdupermodel = TorchModel(identifier='my-torchvision-model', object=model.resnet, preprocess=model.preprocess, postprocess=lambda x: x.numpy().tolist())
Integration and computation of features to the train data inside the db.
With the help of Listener from superduperdb we can
- apply a
modelto compute outputs on a query - outputs are refreshed every-time new data are added
- outputs are saved to the
db.databackend
More information about Listener can be found here.
from superduperdb import Listener

jobs, listener = db.apply(
    Listener(
        model=superdupermodel,
        select=my_collection.find(),
        key='image',
        identifier="features"
    )
)
Step 6: Training
We use the above computed features as listener.output to train the Classification model
from sklearn.linear_model import LogisticRegression
from superduperdb.ext.sklearn.model import SklearnTrainer, Estimator

model = LogisticRegression()
model = Estimator(
    object=model,
    identifier='my-image-model',
    trainer=SklearnTrainer(
        identifier='my-image-trainer',
        key=(listener.outputs, 'label'),
        select=my_collection.find(),
    )
)
Add the model to the DB and train the model with single command superduperdb.apply(model).
db.apply(model)
SuperDuperrr, you've succesfully trained a ML model!!!
Now that we have trained a Logistic regression model by integrating it into Database, we will use the trained model to classify the test data.
Insert test data into db
my_test_collection = Collection('my_test_data')

db.execute(my_test_collection.insert_many(test_data))
Compute features for the test data
jobs, listener_test_images = db.apply(
    Listener(
        model=superdupermodel,
        select=my_test_collection.find(),
        key='image',
        identifier="test_features"
    )
)
Classification of test data
You can easily classify the test data using the .load() of superduperdb as superduperdb.load('model', 'my-model').predict(test_data))
# Get a sample test data
for doc in superddb.execute(test_image_collection.find().limit(1)):
    sample_doc = doc

sample_feature_image = np.array(sample_doc['_outputs']['test_features::0'])
print("predicted", superddb.load('model', 'my-image-model').predict(sample_feature_image.reshape(1, -1)))
print("actual", [sample_doc['label']])
Conclusion
In this blog post, we demonstrated how to implement an image classification system in your [Database] for example using MongoDB, and SuperDuperDB. By leveraging the strengths of SuperDuperDB, we can build a scalable and efficient pipeline for image classification, integrated directly with your database of choice. This approach can be extended to various other machine learning tasks, making it a versatile solution for modern data-driven applications.
Whether you are using MongoDB, Postgres, MySQL, DuckDB, or another database, SuperDuperDB provides the tools necessary for seamless integration and efficient ML model deployment.
To explore more, check out our other use cases in the documentation
Useful Links
Contributors are welcome!
SuperDuperDB is open-source and permissively licensed under the Apache 2.0 license. We would like to encourage developers interested in open-source development to contribute in our discussion forums, issue boards and by making their own pull requests. We'll see you on GitHub!